Tuesday 31 July 2012

Joomla pop-up logins

I think it's all the rage now-a-days to have fancy pop-up login screens. It means it doesn't take up any 'real-estate' on the home page.

Here's a few free plugins for Joomla which can do it:

  • Q Login Popup
    • requires registration to download
    • as it took a while to get the validation
    • adds itself as a module
      • you just have to "publish" it and put it in a position
      • also, put you want it to appear on all pages
    • colour didn't match, so I re-did the button. Placed it in 
      • /modules/mod_qloginpopup/images/login.png
  • YJ Pop Login
    • downloaded without registration
    • it adds a module
      • you just have to "publish" it and put it in a position
      • also, put you want it to appear on all pages
    • It just showed all of it (not just the button). Javascript must have a conflict somewhere

Monday 30 July 2012

Creating a Joomla Template

So, I've made a few websites in Joomla now, but I've only been able to 'cobble' them together either by editing existing templates, or by deleting content from a traditional website I've made and putting the right code it.

This second way is close enough to the real thing. I've found this nice tutorial on how to do it for Joomla 1.5. But it's not too different from the latest version (2.5).

I think the easiest way is to have your own machine setup as a webserver (see this blog on setting that up) and editing the files locally, and easily seeing what Joomla makes of it by viewing the pages through the web browser.

On top of this I found this youtube video explaining how you can setup dreamweaver to interact with the website locally so you can edit all files in dreamweaver. To do it:

  1. Set up a new site in Dreamweaver
  2. edit the local folder to that of the joomla site
  3. in server enter the web URL which you need to type in the browser to access the site
  4. Make sure you tick the "testing" box

Here are some screenshots:
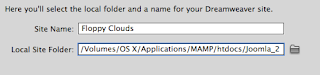
locate the local root folder for that particular joomla website

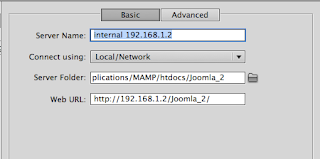
enter the weburl that the computer has to go to view the website

Make sure to tick the "testing" box.
If you havent got a new template in the joomla site yet, just create the folder within the templates folder, make index.php and templateDetails.xml files (found tutorial here), then go to extensions > extension Manager > Discover > press Discover button. If you're templateDetails.xml file is the correct format then you should see it in the list. Tick and click install.

To edit a template:

  1. load up its "index.php" in it's own template folder
  2. click "live view"
  3. click yes to the dialogue box
  4. you will need to change the address of the viewing page to the root of the joomla site. i.e. you are editing the main template, which changes the whole site. So you view the website like normal
I did have a few problems refreshing whatever changes I'd made. The simplist was to just go to File > Save All, which would then work.

Saturday 28 July 2012

Enabling Smart search in Joomla

Now I'm getting on with my website thought it best to add some sort of search. Just as I'm adding a module I see "Smart Search" and "Search". Which one?

So, did a little search on google and found this article from Joomla.org. It seems that "Smart Search" is a newer and fancier "Search" which pretty much replaces the "Search". Even has autocomplete (who needs google now).

So I thought I'd quickly mention the steps to putting this search box onto the Joomla website:
  1. Enable the "Content - Smart Search" plugin in "Plug-in Manager"
    1. by changing the red circle to a green circle.
  2. Index your website
    1. click on "Components" > "Smart Search"
    2. then click on the large icon labelled "Index" at the top
    3. this might take a while depending on the size of your website
  3. Make a "Smart Search" Module with a position on your website
    1. Go to Module Manager
    2. New module
    3. Type = Smart Search
    4. select a position
    5. Save
  4. Cheers

Wednesday 25 July 2012

Creating a blog and posting using www.blogger.com


  1. Load up a web browser, and in the address bar, type: http://www.blogger.com
  2. If you have a ‘Google account’ then you can “Sign In”, if not then click the “Sign Up” button.
  3. Now you have an account you can create a Blog.
  4. Name your blog something relevent to the information you will put on it.
  5. This will be the web-address of your blog. Make it short and relevent.
  6. Choose how you want it to look (this can be changed afterwards) and click “Create blog”
  7. Click “New Post” button to the right of the blog you created
  8. Give your post a title.
  9. Write your article here
  10. Click “Publish” when you’re finished
Finished Tutorial Here:->


Saturday 21 July 2012

installing Trains and Zeppelin Mod for Minecraft

So, my son would like to play this "Trains and Zeppelin Mod" for minecraft. Talk about complicated! I've got a mac which adds a little more complication. Anyway, here's how to do it:

  1. go to terminal and type:
    1. cp ~/Library/Application\ Support/minecraft/bin/minecraft.jar ~/Library/Application\ Support/minecraft/bin/minecraft_backup1.jar
      1. this creates a backup of your .jar file
    2. mkdir ~/temp
      1. this makes a folder in your home folder called temp
    3. cd ~/temp
      1. this moves you into this folder
    4. jar xf ~/Library/Application\ Support/minecraft/bin/minecraft.jar
      1. this unzips the .jar file into the temp folder
  2. download:

    1. Modloader -> download file here
    2. ModloaderMp -> download file here
    3. Minecraft Forge API -> download file here
    4. Trains and Zeppelin Mod -> download file here
  3. unzip these zip files (double click on them)
  4. copy, in the order downloaded, all the contents of these zip files to the ~/temp/ folder on your home drive
    1. a dialogue box will appear saying something along the lines of:
      1. do you want to overwrite this file
    2. tick the "apply to all" box and click "replace"

  5. finally, go back to "Terminal" and type:
    1. jar uf ~/Library/Application\ Support/minecraft/bin/minecraft.jar ./
      1. this zips the temp folder up into the .jar file in the right location
When the game is now loaded, it will tell you down the bottom left that there are 4 mods, and it should all work.

I had a bit of trouble before, but I've found I did things a little different then suggested. Heres some things I did different:
  1. I loaded the game up after just installing the Modloader, ModloaderMp and Minecraft Forge API without the Trains mod installed.
    1. I then went through the process again, and added the Trains and Zeppelin Mod
  2. I didn't delete the META-INF folder in the .jar file
  3. I couldn't find the trainconfig.cfg file.
    1. turns out it is automatically made when minecraft is started.
    2. doesn't look like this file works on Mac OS X 10.6.8?!
    3. None of the Keys work!!!!!!
Hope it helps.

One note I'd like to make is:
  • Why is this such a long winded process. The way I would like to add Mods is to:
    • double click a file which loads and says it's installed!
But, I ask myself, why don't I do this. Well I guess I expect too much.

Thursday 12 July 2012

sendLogon and NHR for OS X 10.7

So, I'm just setting up some new machines with OS X 10.7.4 installed. I tried to install the NHR and sendlogon scripts which I implemented here, but looking into it, it doesn't seem to work.

The NHR side which redirects folders from the networked home drive to a local folder works beautifully, but when I browse the internet, it doesn't let me on sites which i am authorised to go on? So, to conclude, the LIsendLogon.hook isn't running properly.

The one thing I wanted to happen was to get the loginhook to run a script which in turn ran a sendLogon script and the NHR script. But it was an 'either/or' situation. I could never have both scripts running no mater how hard I tried.

After trying many different things, I ended by just giving up and putting the lines for sendLogon into the LIclean.hook script at the bottom. Very frustrating.

I did find an interesting and useful article on running a centralised login script here.

I also found a nice little course on the subject of scripting which I found very useful here and another here

Wednesday 11 July 2012

Creating a bootable OS X 10.7 install disk

As i was looking into imaging some new iMacs, I came across this article on how to create a mac bootable 10.7 disk. Simple procedure really:


  1. go into recovery mode (command + R)
  2. plug in external drive
  3. reinstall mac os x
  4. select external drive to install on
  5. after it has finished downloading, and has gone to a black screen, unplug external hard drive.
  6. the file InstallESD.dmg will be on the external. This is what you want.
  7. load up disk utility and restore this image on a volume
  8. done


OS X 10.7 and 10.8 and 802.1X wifi configuration

So, new operating system new things to do. Just read the Help Center bit on "Connect to a network that requires 802.1X authentication". The interesting bit was:

In most cases your network administrator provides a configuration profile that contains the information and settings you need to authenticate with the network.

To get on the 802.1X you now need to do a lot of stuff. Looks like it needs a .mobileconfig file.

Just read this Apple Discussion on it which gives you a nice guide on how to do it.

After much time we finally got around to having a network administrator on the case.

So, we were looking for a way to connect to the wifi without using usernames and passwords. The answer was EAP-TLS. We followed the link above and created a certificate for the computer. Only trouble was we had problems enabling TLS on the wifi. Network administrator looking into this I think.


We resorted to PEAP I think. We made a .mobileconfig file using the iphone configuration utility, got hold of the wifi certificate, put that in the credentials payload of the .mobileconfig file, and loaded it up on the machine in question. It added the certificate to the Users keychain (not system!) and put the old 802.1X stuff in the network settings! When we turned the wifi on it tried to connect to the wifi (with the username and password we set in the .mobileconfig file) but it came up with an error. Could not verify the server. Looks like the configuration file was at fault. Seems that the certificate server is automatically dishing out expired certificates. Network administrator is trying to fix.

A handy page to manually create a .mobileconfig file with more settings then the iphone configuration utility can create was here. You can specify the certificate to be added to the system keychain, and also that the wifi loads at login window!


------

So far so good. Our network team has now made a new wifi SSID with EAP-TLS. Using this tutorial we made the machine have a signed certificate from the certificate server, and add the profile for the wifi. We used this certificate (with the username - host/DNSnameofMachineHere) to successfully get onto the wifi, but did it manually.

Next time we'll need to set this file up with the wifi details properly (we didn't add system login window stuff here).


-----

We're now giving up on the old 'manually edit the .mobileconfig file' and going for the 'Mavericks Server' option.

Here's the help page on it

So, we've set up a mavericks server (just a computer with Mavericks installed and the "Server" app installed).

I've enabled "Profile Manager" and set it up so in a browser you can go to:
http://YourMavericksServer.ac.uk/profilemanager

go to groups, general.
from the list of payloads, go to AD Certificate

found this article on how to configure the page

Not quite working yet. Getting an error when installing the profile.

Need to add devices, but I think it looks like you have to add users which are in charge of devices? Not sure.

Tuesday 10 July 2012

Creating a Master Image for Mac OS X 10.7

So, I've just got a bunch of new iMacs and I'm creating a new master so I thought I could note down what I'm doing.


  1. Go through the initial steps of OS X 10.7.3
    1. username - Administrator
    2. fill in details
  2. setup some System Preferences
    1. in System Preferences > Users
      1. Guests
        1. Tick "Allow Guests to log into this computer"
      2. Login Options
        1. tick the "show username and password fields"
        2. go to Join and open Directory Utility
          1. Active Directory
            1. domain students.chesterfield.ac.uk
            2. name the computer
              1. domain admin username and password
          2. LDAPv3
            1. put in mac server address
            2. its all automatic
          3. goto Edit > Enable Root User
            1. enter a special root password
    2. System Preferences > Network
      1. Ethernet > Advanced > Proxies > Automatically Detect Settings
    3. System Preferences > Date and Time
      1. tick "set date and time automatically" and give it a****dc1.chesterfield.ac.uk
    4. System Preferences > Sharing > Remote Management
      1. Tick Remote Management
      2. click "Options"
        1. tick all of these
      3. click "Computer Settings"
        1. tick all of these
        2. put a password for VNC
  3. Install stuff:
    1. Sendlogon
      1. for proxy login
    2. NHR
      1. for Caches and other network folder redirections
    3. Fix NHR and Sendlogon
      1. so that sendlogon is added to the NHR login script
    4. UniFLOW client
      1. for print management info
    5. Intuos drivers
      1. for tablets
    6. Brushes Viewer
    7. Adobe Creative Suite 5
      1. mount the CD Master dmg file and run the normal install file
        1. don't need to drag it to the local drive
    8. Adobe Acrobat Pro 9
      1. just drag it to the Applications folder
      2. run it once to put in serial number
    9. Update Photoshop Camera RAW
    10. Burn 2.5.1
      1. for burning a multitude of different disks and ISO's
    11. Carbon Copy Cloner 3.4.5
      1. just drag app to Applications folder
    12. Celtx 2.9.7
    13. ClickView 2.0.0
      1. comes with Flip4Mac
    14. DivX 7.3
    15. DropBox 0.7.110
      1. drag to Applications folder
    16. Firefox 13.0.1
      1. drag to desktop
      2. if there's no profile in the users library it defaults to "use system settings"
    17. Google Chrome version 20
    18. Sketchup 8.0.14345
    19. Final Cut Studio 2

      1. Running Final Cut Studio 2 from disk it comes up with:
        1. You can't open the application FinalCutStudio.mpkg because PowerPC applications are no longer supported.
        2. Doh!
      2. I did a search on Google and found this Blog Article on how to manage it
        1. Basically run the installer from Command Line by typing the following:
        2. sudo installer -package /Volumes/Final\ Cut\ Studio/Installer/FinalCutStudio.mpkg -target /
        3. Came up with lots of Errors though, as described in the blog:
          1. 2012-07-09 13:02:25.728 installer[26889:9803] PackageKit: Token definition is missing bundle identifier, skipping: {
          2.     path = "/Applications/Final Cut Pro.app";
          3.     searchPlugin = CheckPath;
          4. }
        4. looks like it's searching for previously installed versions?
      3. In the end it came up with:
        1. installer: The install was successful.
      4. although it usually takes a few hours to install, this took 8 minutes
        1. It's because it didn't install the extras
        2. To do so, you can do it from the disks:
          1. Audio Content for Soundtrack Pro
          2. Motion Content
          3. DVD Studio Content
          4. LiveType Media 1 and 2
            1. comes up with the same PowerPC errors
            2. Type:
              1. sudo installer -package /Volumes/LiveType\ Media\ 1/Installer/LiveTypeMedia1.mpkg -target /
              2. sudo installer -package /Volumes/LiveType\ Media\ 2/Installer/LiveTypeMedia2A.pkg -target /
    20. XDCAM Final Cut Pro Plugin
      1. Needs Final Cut Pro 6.0.3 or above. Installed version is 6.0.1.
        1. Update via Software Update
    21. Handbrake 0.9.6
    22. iWork '09
    23. Logic Studio
      1. Same error as with Final Cut Studio
      2. Found this website with similar results
      3. Typed this:
        1. sudo installer -package /Volumes/Logic\ Studio/Installer/LogicStudio.mpkg  -target / -verbose
        2. decided to use verbose mode to see what exactly happens. Most interesting.
      4. I think it helps if you have all your disks saved as disk images and all mounted at once. Seems to work.
      5. Not sure if it installed the extras. To make sure I ran the Audio Content installer
      6. What might be worth looking into is this forum above for installing extras
        1. ran this as in the website above:
          1. for f in /Volumes/Jam\ Pack\ Content\ 1/Installer/Packages/*.pkg; do sudo /usr/sbin/installer -pkg "$f" -target / -verbose; done
    24. Maya 2008
      1. although not the licence aw.dat file
    25. Microsoft Office 2011
    26. MPlayer OSX Extended R14
      1. Plays nearly all Video formats
    27. Nikon ViewNX 2
      1. for Nikon Camera RAW stuff
    28. Omni Disk Sweeper 1.7.2
      1. for checking disk space issues
    29. Libre Office 3.5.4
      1. basically an off-shoot of OpenOffice
    30. RealPlayer SP 12
      1. for streaming stuff
      2. might have to put in proxy settings?
        1. not even sure if we're using this?
        2. yes, it is setup by autodetect settings
        3. set through ~/Library/Preferences/com.RealNetworks.RealPlayer
        4. particularly "RealPlayer\UseSystemHTTPProxy" string "1"
    31. Skype 5.8.0.945
      1. you never know!
    32. SMART board 10.8
      1. Apparently rolling out 11 next year
    33. VLC Media Player 2.0.2
    34. Canon MFD drivers
      1. whoops, missed off these!
  4. Log out and back in as Networked user to connect to internet (with sendlogon)
    1. Note: needs to be on the Mac VLAN to use sendlogon
    2. Test Safari and other things for internet connectivity
      1. working
    3. Do an Apple Software Update
      1. update from 10.7.3 to 10.7.4
      2. airport update
      3. iTunes 10.6.3
        1. connection reset by peer
        2. looks like a manual download
      4. Camera RAW update
      5. etc...
    4. Microsoft Update
    5. Adobe Update
    6. App Store Updates!
      1. it's a new one to me
      2. you also NEED an Apple ID!
      3. having a few problems downloading BIG updates for iPhoto and iMovie
        1. seems to stop 400MB into the download and says it's having trouble
        2. Lucky thing is that it carries on from where it left off, so just keep pressing the retry button and it'll eventually download it all
      4. Install more Apps:
        1. iBooks Author
          1. for making iBooks!
      5. SketchBook Express
        1. made by SketchBook Pro people
      6. Need to look into App Store Permissions
        1. can anyone install via the App Store?
        2. is it just saved to their Home Drive?
        3. Confussed!
        4. this forum might help
    7. Test all Applications:
      1. Illustrator
        1. Working
      2. Photoshop
        1. Working
      3. InDesign
        1. Crashes when you try the Spell Check
          1. turns out NHR gives the wrong permissions for the ~/Library/Application\ Support/Adobe folder
          2. I changed NHR so that this Adobe folder is a symlink instead of the child folders for Illustrator and Acrobat
            1. added these lines to LIclean.hook
              1. rm -rf "$home_loc"/Library/Application\ Support/Adobe
              2. mkdir /tmp/$1/Adobe
              3. ln -s /tmp/$1/Adobe/ "$home_loc"/Library/Application\ Support/Adobe
          3. overwrote LIclean.hook in NHR.pkg/Contents/Archive.pax.gz
            1. first unzip it
            2. replace file
            3. zip it back up again:
              1. ditto -c --keepParent /Archive/Library Archive.pax
              2. gzip -9 Archive.pax 
      4. Fireworks
        1. working
      5. Flash
        1. working
      6. Dreamweaver
        1. hangs when loading up.
        2. updating to 11.0.4
          1. now it prompts to load up extension manager every time!
          2. but it does end up loading Dreamweaver
      7. Acrobat Pro
        1. Working
      8. Aperture
        1. Working
      9. Audacity
        1. Working
      10. BookSmart
        1. permissions issue with .app folder
          1. gave everyone read only
        2. crashes on load up
          1. found this entry in Console Log
            1. 06/07/2012 15:21:23.621 [0x0-0xb40b4].com.blurb.booksmart: log4j:ERROR setFile(null,true) call failed.
            2. 06/07/2012 15:21:23.621 [0x0-0xb40b4].com.blurb.booksmart: java.io.FileNotFoundException: metrics.log (Permission denied)
            3. 06/07/2012 15:21:26.275 com.apple.launchd.peruser.2069522553: ([0x0-0xb40b4].com.blurb.booksmart[6906]) Exited with code: 1
          2. assuming it's a problem with folder permissions in ~/Library/
          3. not sure it's worth fixing?
      11. Word
        1. worked
      12. Powerpoint
        1. worked
      13. Excel
        1. worked
      14. outlook
      15. Google Chrome
        1. crashes on startup
          1. loads a window with google mail login screen and then sends crash report.
          2. just tried creating a symlink to the local drive for ~/Library/Application\ Support
            1. ln -s /Users/Shared/temp/Google ~/Library/Application\ Support 
          3. Works a treat
          4. Need to add this to NHR scripts
            1. Viewed the Package contents of NHR.pkg
            2. unzipped Archive.pax.gz
            3. went into Library/Scripts/
            4. edited LIclean.hook
              1. added these lines:
              2. mkdir /tmp/$1/Google
              3. rm -rf "$home_loc"/Library/Application\ Support/Google
              4. ln -s /tmp/$1/Google "$home_loc"/Library/Application\ Support/
            5. made it into an Archive.pax.gz file (found in this forum)
              1. ditto -c --keepParent /Volumes/General\ Work/Problem\ Solve/NHR\ with\ new\ redirections/Archive/Library /Volumes/General\ Work/Problem\ Solve/NHR\ with\ new\ redirections/New-12-8-2012/Archive.pax
              2. gzip -9 /Volumes/General\ Work/Problem\ Solve/NHR\ with\ new\ redirections/New-12-8-2012/Archive.pax 
            6. put it back in the Package Contents
          5. done
        2. Picks up Proxy settings from operating system
      16. Firefox
        1. works a charm
        2. Picks up proxy settings from system
      17. Celtx
        1. worked
      18. Clickview
        1. needs the server set as clickview.s*******.chesterfield.ac.uk
          1. set in file: ~/Library/Preferences/clickview.player.server.plist
          2. either set on xserves managed preferences
          3. or on the OS X managed preferences
      19. fix everything please
        1. works beautifully
      20. Sketchup
        1. worked
      21. HandBrake
        1. Worked
      22. iBooks Author
        1. Worked
      23. iMovie
        1. Worked
      24. iPhoto
        1. prompts to upgrade library and fails as it is on an unsupported media
          1. Known Problem
      25. iTunes
        1. worked
      26. Pages
        1. Worked
      27. Keynote
        1. worked
      28. numbers
        1. worked
      29. Libre Office
        1. worked
      30. MPlayer OSX extended
        1. Worked
      31. realPlayer
        1. worked
      32. SketchBook Express
        1. Worked
      33. Skype
        1. worked
      34. Notebook
        1. needed license but we have it
        2. worked
      35. Final Cut Pro
        1. worked
      36. Logic
        1. worked
    8. Log out of Networked user account
  5. Image a Master from the machine
    1. Unbind from Active Directory
    2. delete unwanted files
    3. Boot from another disk. Either:
      1. Netboot (if possible?)
        1. not possible because server is running OS X 10.4.9 with Deploy Studio RC20
      2. boot from install CD, mount server drive and image machine using disk utility
        1. does not come with disks anymore
        2. found this article explaining the new procedures
          1. boot up into Recovery Mode (command + R)
            1. Nice article here about Recovery Mode
      3. target disk mode to a machine which can netboot (or run the /Utilities/Deploy Studio Runtime)
    4. Make a image from a disk
  6. test the master image works
    1. get another machine
    2. Unmount disk which is being re-imaged and image it. Several Ways:
      1. target disk mode to another machine
      2. Recovery mode (command + R)
        1. go to terminal
        2. type:
          1. mkdir /Volumes/Images
          2. mount -t afp afp://admin:password@name.of.server.uk/Images /Volumes/Images
        3. exit terminal
        4. open disk utility
        5. restore
        6. source - select disk image on the server
        7. target -  select partition
      3. done


HP Shortcut Manager

Whilst imaging a machine I noticed a process taking up 100% of one of the cores named HPShortcutManager. After a quick search I found this Apple Discussion on the issue. It appears there's an issue with HP Scanjet Scanners button manager. It isn't very effecient at waiting for someone pressing one of the buttons on the front of the scanner.

Best way to fix is by deleting the HPShortcutManagerstartup.app:
sudo rm -R /Library/Application\ Support/Hewlett-Packard/HP\ Scanjet\ Scanner/HPShortcutManagerStartup.app

Done

Saturday 7 July 2012

Embedding multimedia into Joomla

So, I just wanted to make an article with an embedded youtube video. Easy you would think:

  1. go to the youtube video
    1. click share > embed
    2. copy code
  2. make a new joomla article
    1. write what you want
    2. go to code view
    3. paste iframe code
    4. save
  3. done
Not so simple. Seems when you go back to 'not code' view, it gets rid of the pasted bit of code. Very annoying.

After reading a forum discussion it appears for some reason it's best to have an extension. The simplest is "Allvideos". Download and install it under extensions. Enable it under "Plugin Manager". Then the procedure is:
  1. go to the youtube video
    1. get the id code of the video (the last bit of the address in the address bar)
      1. i.e. - http://www.youtube.com/watch?v=kI97VGGHkic (bit in bold)
  2. make a new joomla article
    1. write what you want
    2. where you want the video to appear type:
      1. {youtube}kI97VGGHkic{/youtube}
    3. save
  3. done
So, in the end not too hard, just have to know the right buttons to press. Not good user design if you ask me, i.e. I had to look it up in a forum. The good thing about it is that you can embed all sorts of stuff, like flv files, mp3 files and more like it. Nice.

Thursday 5 July 2012

What to do if your windows computer is running ridiculously slow (only applies to Microsoft Windows)

So, I get a lot of people coming to me with Windows PC's and laptops which are running ridiculously slow. As I'm fixing one this very moment, I thought I'd document what I have found to be the easiest ways to get them running to their original speed (when they were first purchased).

I will run through it in a chronological order.

  1. First things first, you need to be able to get the system to a 'usable' state, meaning you can click on stuff and something happens, and also you can install stuff. Here's how I do it in worst case scenarios:
    1. Boot up into safe mode (continuously press F8 when the computer is booting up)
    2. Enable the "Windows Installer" in safe mode.
      1. Heres a link to an article where I describe how to do this.
    3. A part from safe mode, you can always:
      1. open the task manager and end processes of anything which is taking up the CPU, but this is a little frustrating.
      2. delete startup items in the Start > Programs > Startup menu.
      3. Go to  Start > Run -> msconfig and click "disable startups" described here
    4. If you're still having problems, run hijackthis
      1. It's a very good program and helps you delete entries in Windows linked with Malicious Programs. Here's the home page
      2. When you run it you can make a text file. Paste this text file on the home page and it'll analyse it and tell you which things you'll want to remove.
      3. Tick the right boxes and bingo.
  2. Install and run a free anti-virus.
    1. At the moment the top runners for free anti-virus are AVG and AntiVir
    2. I have found that  in the past a lot of anti-virus programs are the things that actually slow your machine down. This is one of the reasons AVG and AntiVir have such good ratings.
  3. Install and run a free anti-malware application
    1. At the moment the top runner is MalwareBytes
  4. Install and run TuneUp Utilities 30 day free trial, currently on version 2012.
    1. You get a free 30 day trial, but I've found you really only need a 1 hour trial to fix all the problems. Luckily it doesn't "unfix" the problems once it has expired.
    2. The main part to run is "one-click-maintanance"
      1. It runs through your system and tells you how many things it can 'fix'.
      2. Click the fix button
      3. Keep running this program until it does not fix anything anymore.
If these basic steps aren't going to fix it, you're best option is to re-install Windows a-fresh and make a nice new start. Possibly consider installing the operating system it came with to begin with? Or even think about another operating system (i.e. not windows). Ubuntu, OS X?

At the end of the day, your computer will at best run at the speed it was running when you first bought it. If you upgrade the operating system you will notice a slow down.

Also, programs which run at startup are going to slow your machine down. I only have 3 running on my startup; DropBox, Carbonite and MAMP. I suggest you really think about how you want to use your computer. It's all about compromise. 

Any suggestions are welcome, especially if it's easier than this list of 'things to do'.