Showing posts with label Deploy. Show all posts

Thursday, 1 August 2013

Re-imaging Windows 7 on Apple Macs

So, we are now trialing a newer system for deploying Windows 7 on to our Apple Macs. Previously we've used Deploystudio, but as our Apple Server is too old, it is no longer up to the task.

For the rest of the PC's we use the Microsoft Imaging technique (whatever this is), and we're trying it with our macs.

Here's a step by step of what to do with the installer disk:

  1. insert disk
  2. set the default boot disk to be Windows (assuming Windows was previously installed)
  3. reboot and hold ALT
  4. select the CD
  5. Press ANY KEY
  6. log in with own credentials
  7. Select task sequence
    1. to determine which volume to boot from you need to run DISKPART. Type:
      1. SELECT DISK 0
      2. LIST VOLUMES
      3. SELECT VOLUME (type the volume number)
      4. LIST PARTITIONS
  8. Select to install BootCamp drivers
  9. Put name, domain details in
  10. Go!

Thursday, 21 February 2013

deploying Flash Player on OS X using Apple Remote Desktop

So, all computer suites now have outdated flash players. To deploy I found it VERY difficult to find the official solution. Adobe tend to want each computer to be installed by a user:

http://www.adobe.com/devnet/flashplayer/enterprise_deployment.html


But of course students log in and do not have permission to install! Luckily someone found a quick solution here. Turns out the flash installer (.app!!!) comes with a pkg file. Solved. (haven't tried it yet!!)

Just tried it on OS X 10.6 and worked perfectly!!

Don't know why this isn't documented very much.

Basically:

  1. download flash player
  2. right click on the install flash player.app file and select "Show package contents"
  3. go to Contents > Resources > Adobe Flash Player.pkg
  4. copy this and use Apple Remote Desktop to deploy!
Cheers


The latest news is that you're best off applying for the latest distribution, which involves filling out a small form, confirming your email address, and then waiting for approval. Takes about 1 hour. Here's a link:

http://www.adobe.com/uk/products/players/flash-player-distribution.html

They then send you a link to the installer (pkg file) Yay!

Thursday, 11 October 2012

Imaging Windows XP on a Mac - filling (expanding) the partition

So, came to a machine today which I'd just re-imaged with windows XP using DeployStudio. Windows thought the partition was only 30Gb's  but was actually 110GB's. I had seen this before but never written down how to fix it.

First thing I tried was the Disk Checking utility. This did not fix the problem.

After this I didn't know what to do. I turned to google and found this forum answer. Turns out when re-imaging there is an option to "Auto Expand" windows to fill the partition but sometimes does not work. To fix, use WinClone. Unfortunately the latest version of WinClone now costs $19.99, but the older V2.2 was free. I eventually found WinClone V2.2 here.

You also need NTFSProgs so OS X can understand NTFS partitions. WinClone downloads them automatically, here is the link it uses.

Here's a screenshot of it in action:
WinClone Expanding windows file system

Go to Tools > Expand Windows file system.

Takes around 8 mins.

Worked. Cheers.

Wednesday, 27 June 2012

DeployStudio rc20 not showing new Disk Image Masters

I've just taken a Master image using DeployStudio but the image doesn't appear in the list of images, nor in the /Masters/HFS/ directory on the server. Of course this has happened before so I'm merely writing this down as reference.

The reason is because it uses a directory called /Masters/.workInProgress/ to store disk images whilst they're being made. When they are complete (which is after post processing like ASR scan and gzip) they get moved into the appropriate folder, in this case /Masters/HFS/. I think something happened and it never got moved. In the terminal I simply typed:

admin$ mv /Masters/.workInProgress/OSX-10_6_6-SMALL-2012-06-27.i386.hfs.dmg ../HFS/


But replace OSX-10_6_6-SMALL-2012-06-27.i386.hfs.dmg with the name of your disk image. Tab completion is the easiest way.

Friday, 20 April 2012

Deploying Maya 2012 and Backburner

So, I want to set up a nice little render farm, and so need all machines to have the software on. First things first, deployment.

I had a look at the Maya install dmg and found that the initial application is not a pkg file. But fortunately, inside the package contents:
/Volumes/Maya/Install\ Maya\ 2012.app/Contents/Resources/Maya....

  • Maya2012.mpkg
  • Additional Items
    • ADC_docs6.0.pkg
    • AdLM_standalone.mpkg
    • AutodeskBackburner2012.mpkg
    • AutodeskDirectConnect6.0.pkg
    • AutodeskUninstaller.pkg
    • Composite2012.pkg
    • CraftDirectorStudioMaya2012.dmg
    • Maya_quicktime_components.pkg
    • autodesk.backburner.monitor-2012.0_423_i386.pkg
    • autodesk.webentry-1.0-603.i386.pkg
    • backburner-2012.0_1560_i386.pkg
    • dmmPluginForMaya2012x64.pkg
All I did was to highlight all these files and have Apple Remote Desktop install them for me, minus "CraftDirectorStudioMaya2012.dmg" which I am don't think I need.


On going to the computer I tested this process on, I found that a user was already logged on and a message saying:
a certain process needed "Rosetta" installing should I do so?

I clicked yes and forgot to read which Application it was. Looking in the logs I found:
20/04/2012 11:44:06 com.apple.coreservices.uiagent[1050] 11:44:06CoreServicesUIAgent[1050] : Application failed to launch (id = aksusbd, version = Unknown reason = kLSNoRosettaEnvironmentErr)

It was this "aksusbd" which needed it.

I also found in the logs that the install process tries to start backburner and comes up with the same error message I came up with here:
/usr/discreet/backburner/backburner: line 64: syntax error: unexpected end of file


I can fix this simply by copying the fixed version of the backburner file


just found this update for backburner. Found on this page

Friday, 16 December 2011

Upgrading and imaging iPads (or any IOS device)

Thought I'd document the technique I use for managing the iPads in an Academic environment.

Using this technique you can backup an iPad and restore it to all your other iPads.


A point to note is that you cannot restore an IOS 5 "Backup" onto an IOS 4 iPad. You will need to manually update the iPad to IOS 5 first.


Right click (or CTRL click) on the IOS device on the list on the left


Create an image from a "Master" iPad (called "backup")

  1. Get your iPad exactly how you want it
  2. Plug it into iTunes
  3. Right click on the IOS device in the list on the left
  4. Click "Backup"
Restore an image onto IOS device
  1. Plug IOS device in to iTunes 
  2. Plug it into iTunes
  3. Right click on the IOS device in the list on the left
  4. Click "Restore from Backup"
If the IOS version is the same, it should list all the "Backups" or images that have been taken. Select the one you want.

Friday, 30 September 2011

Making a pkg file for installing sendLogon for Bloxx on OS X

In a previous post I described how we're getting a new web filtering system called Bloxx, which needs the sendLogon program to be installed and run as a login script on all the Apple Macs (OS X).

I used Iceberg free application to make the PKG file as I've used it before with relative ease, and also couldn't find the latest official Apple PKG maker app!!

Its all working now so here's how I did it:
  1. Made a new project in Iceburg, and made a nice little folder to hold all the files needed (makes it easier to find things)
  2. I filled in the top section "Settings"
  3. Next was the "Scripts" section. I had to make a script which changed the com.apple.loginwindow plist file to add the LoginHook /usr/bin/login.sh
    1. I ran nano from the command line (nano ~Desktop/sendLogonfiles/Install\ sendLogon/writeloginhook.sh)
       and typed:
    2.  #!/bin/tcsh
      sudo defaults write com.apple.loginwindow LoginHook /usr/bin/login.sh
    3. I found I had to put "sudo" into the script so that it had the right permissions to write to the file. Not sure why else it didn't work?
    4. I saved the file and made the file executable - chmod 755 ~Desktop/sendLogonfiles/Install\ sendLogon/writeloginhook.sh
  4. I then added this script to the "PostFlight" script, and set the path to "Relative". Note - I found an article here documenting the definition of each of these types of scripts. Most were concerned with whether this was an upgrade or not, and would only run once.
  5. Finally was the "Files" section. 
    1. I firstly put the files in the project folder.
    2. I set these files with the correct permissions (as in the tutorial folder for sendLogon). chmod 755
    3. Then, in Iceberg, I had to add the folders; /usr/ and /usr/bin/, which were not there.
    4. I then made the "Default Destination" the /usr/bin/ folder
    5. Finally I added the login.sh file and the sendLogon file.
I've just tested this through the Apple Remote Desktop Task Server on a single MacBook Pro and worked a charm (had to ring ICT though to add its' IP address to the Bloxx list of computers with sendLogon working)

Note: There is potential also for adding to this a little script which changes the proxy settings to the system and maybe also Firefox, but it would be easier to control these settings through a .pac file or .wpad file.

Wednesday, 28 September 2011

New Web Filter - Bloxx and sendLogon deployment on OS X

So we've now got a new web filtering system which needs testing on the Macs and then deploying. The new system is currently running alongside the old, the later of which will slowly be phased out.

The new system does come with one small bonus for the Apple Macs as it works alongside a program called "sendLogon" which sends the credentials of the user to the server and automatically authenticating them to use the internet. This sendLogon was downloaded here, and comes with instructions:


Running sendLogon automatically on Mac OSX
You need to take the following steps:

1) Download the Send Logon program from http://www.bloxx.com/downloads/sendLogon_osx_10.4.universal.tar.gz to the desktop.
2) Browse to ‘Applications->Utilities’ and run the ‘Terminal’ application.
3) Type ‘cd ~/Desktop’.
4) Type 'tar zxvf sendLogon_osx_10.4.universal.tar.gz'.
5) Type ‘sudo cp sendLogon /usr/bin’ and enter your password when prompted.
6) Type ‘sudo nano /usr/bin/login.sh’.
7) Enter the following lines:

#!/bin/tcsh

/usr/bin/sendLogon 3898 $1

8) When finished, press ctrl-o followed by return, to save the file.
9) Press ctrl-x to exit.
10) Run the following commands to set the correct permissions on the utility and login script:

sudo chmod 755 /usr/bin/login.sh
sudo chmod 755 /usr/bin/sendLogon

11) Run the following command:

sudo defaults write com.apple.loginwindow LoginHook /usr/bin/login.sh

The sendLogon utility should now run for every user that logs on.
This all worked splendidly. Our server address is XXX.XXX.XXX.21. The proxy settings are XXX.XXX.XXX.23 port 8080 though. Just need to remember that the computer has to be in the list of this filter system as using the sendLogon program (took me 20 mins before I remembered this!).

To deploy this the idea is to create a pkg file which copies the two files login.sh and sendLogon to /usr/bin and also sends the command for the LoginHook.

Note that all the Macs I will run this on do not have any login scripts which run from the computer and hence it doesn't matter if you overwrite the login.sh file. For those who do have login scripts then they will need to append to this file, which isn't too hard.

I will use the Iceberg App to create the pkg file and run it through the task server to deploy to all computer suites and staff machines.

We did have a choice whether to control the LoginHook from the Xserver or just have the clients controled locally. We chose the later as ICT Services do not control the Xserver, which is just used for the one Directorate.

I shall note in a later post how I created the pkg file.

Monday, 19 September 2011

Making an Application which fixes all the little things

Fix Everything Please Application
A while ago I had the idea of making a little application which fixes any little problems we have in the college with the Apple Mac accounts. Part of the trouble is to do with the Active Directory accounts, but a lot of the trouble comes from Applications coming up with errors related to the preferences.

Basically, this program deletes preferences and folders to all the programs which cause the most problems.

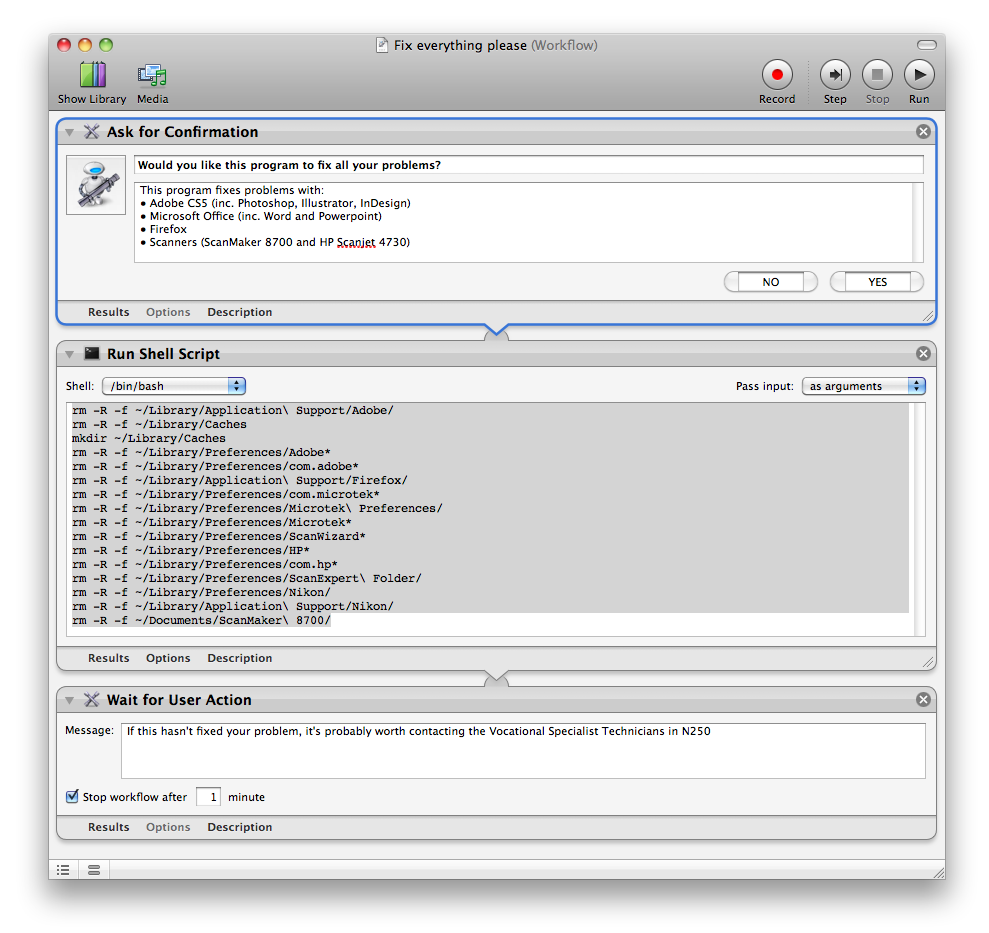
I made the program in Automator, and it basically just runs a shell script with a lot of 'rm' for removing stuff. I originally tried using a lot of the options in the library to find certain files and put them in the trash. This doesn't work for different users though, as they have a different location for their home drive. So I ended up using the '~' option to specify the users home drive:

these three lines remove anything related to Adobe:

rm -R -f ~/Library/Application\ Support/Adobe/
rm -R -f ~/Library/Preferences/Adobe*
rm -R -f ~/Library/Preferences/com.adobe*

this removes the key Firefox preferences, which cause it to say "A copy of Firefox is already open"
rm -R -f ~/Library/Application\ Support/Firefox/

this removes any ScanWizard preferences
rm -R -f ~/Library/Preferences/com.microtek*
rm -R -f ~/Library/Preferences/Microtek\ Preferences/
rm -R -f ~/Library/Preferences/Microtek*
rm -R -f ~/Library/Preferences/ScanWizard*
rm -R -f ~/Documents/ScanMaker\ 8700/

this removes any HP Scanner preferences
rm -R -f ~/Library/Preferences/HP*
rm -R -f ~/Library/Preferences/com.hp*
rm -R -f ~/Library/Preferences/ScanExpert\ Folder/

This removes Nikon references for the Nikon browser
rm -R -f ~/Library/Preferences/Nikon/
rm -R -f ~/Library/Application\ Support/Nikon/

This removes the Network Home Relocation for the Caches folder and makes a new one

rm -R -f ~/Library/Caches
mkdir ~/Library/Caches

I added the -R so that it would force the removal, and the -f so it doesn't come up with an error if the file/folder doesn't exist.

Here's a screenshot of the workflow in Automator:

Automator workflow for "Fix Everything Please"
It proves very popular amongst the students and staff here, and I just add to the list when another program has this sort of problem. I just have to work out a quick way of deploying it to all the workstations, hopefully make a '.pkg' file and put it to the task server.

Friday, 29 July 2011

Deploy Studio RC20 MultiCasting on OS X 10.4.11 xserver

After finally finishing the Master image it came in at 72GB! Takes about 3 hours to image one machine and 6 hours for two. So I thought I'd give Multicasting another go (I tried it a couple of years ago with lots of lost packets!). Also just heard they refitted the server room so maybe this'll help.

It was set up a few months back when we had DHCP problems caused by upgrading DeployStudio to RC20. You get the option to set up Multicasting when you set up DeployStudio Server. Here's my post


So taking a new iMac 24" and an old white 21" iMac I thought I'd set up Multicasting. First in DeployStudio admin I clicked the image and clicked the Multicast button at the bottom (looks like the Airport icon)

Airport Icon at bottom denotes MultiCasting
This now shows it's multicasting in the Activity section.

I've set up a workflow to restore an image to a volume, and in this set up some Multicast options.

Setting up Multicast options in a workflow
So far I have tried:

  • Attempt 1
    • Stream Rate 6MB/s
    • Clients Disk Speed 120MB/s (I wasn't sure about the older 21" iMac so I slowed it from 200MB/s)
    • Start Trigger 2 client
    • Result:
      • Stream Rate 5MB/s
      • Disk Rate changes from 5MB/s to 15MB/s
I've been writing this as the process is going, and just noticed at 12:48 that some errors occurred. I noticed that this happened around the time that I loaded DeployStudio Admin on my machine, so I think this might have caused a slight interruption on the server (and it is 7 years old now). I do remember that I once remote'd into a machine whilst imaging which interrupted it. So the process is a little delicate. I shall wait to see if it has effected the process or whether it can cope with a few byte missing here and there?

After waiting until the 100% marker (which took 3 hours) it seemed to have stopped with no more errors, although it didn't quite finish. It said something about "starting" but just stopped there. I waited for another hour with no more progress so decided to reboot. Upon reboot the startup disk was not set, and the came up with the white screen with a question mark!

My initial conclusion was that the process had failed, but in hindsight I think that maybe the computers were waiting the data that was lost to be broadcast again, but this might be me clutching at straws. I shall look into it at the end of August. For now we'll just have the old method to use.

Thursday, 21 July 2011

iPad setup and Deployment

So, I was shown this document on iPads in Business and it seems quite relevant to our situation. Looks like the setup is controlled by xml files which is nice, and there is potential for managing them wirelessly. The app we need is the "iPhone Configuration Utility" of which the latest version, 3.2, is only supported on OS X 10.6. Looking at back-dates I've found version 2.1 which apparently works on 10.5 and was the last to support it.

The information for iPhone Configuration Utility is found here. Nice simple interface which should make the job easier.